

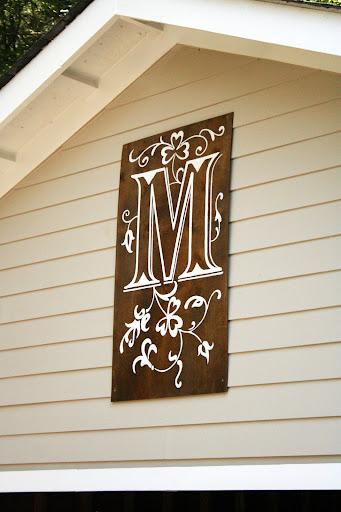
Jessica and I both get girlier and girlier each week, and I find there's nothing to which I can't picture adding a flourish or a monogram. This time, it was our garage. Allen built this garage with his own two hands (and those of several good friends), and I came along and stuck M's and clovers to it. (For what it's worth, Allen likes the M; the other elements, he says, are just another thing making our house "Girly as ****.")
Here are the supplies you'll need to gussy up a garage, front porch, or foyer:
- thin birch plywood (mine is about 24" x 40", because that's what we had laying around)
- wood stain
- polyurethane
- an image you like
- a big sheet of carbon paper, optional
- painter's tape or masking tape
- a charcoal pencil or chalk
- oil paint - the kind you get in a pint-size can at the hardware store
- a paintbrush
Stain the plywood your desired color - I think I used Minwax Special Walnut. Staining and sealing instructions are in the second half of this post. Wait to polyurethane the board after you've painted your design.
The Cuts & Caps section of BriarPress.org has a lot of great, free images - I got this one from the Initial Caps subset.
Size your image to fit the board you'll paint on. I had to stretch elongate mine a little to fit the board.
The Cuts & Caps section of BriarPress.org has a lot of great, free images - I got this one from the Initial Caps subset.
Size your image to fit the board you'll paint on. I had to stretch elongate mine a little to fit the board.
If you want, you can print your image at a large scale, and use carbon paper to trace the image right onto the board. Or you could use a grid method, as follows:
Either print your image (at any scale), or open it in a program that will allow you to add guides, like Photoshop.
Divide your image into several equal segments in each direction, either by drawing lines or by digitally adding guides. The idea is to subdivide the image into portions; each portion should be simple enough on its own to draw easily by hand.
Once your plywood is completely dry, replicate the grid on the plywood (sized up, but with the same exact proportions). The charcoal pencil I used wasn't easy to erase, and I didn't want stray lines all over my board, so I used painter's tape for the lines. I also used tape for the long, straight lines of the design.

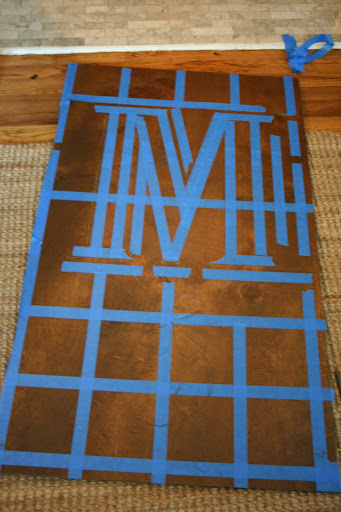
Use chalk or charcoal to draw the image on your board, section by section, removing the tape as needed.

Once the image is outlined, paint on one coat of oil paint. Let dry, and apply more coats as needed - I used three coats in some places. Obviously, it's a bit tedious. Now just give it a coat or two of polyurethane.
And - credit where credit is due - Allen cheerfully and expertly hung the sign (a nail gun works fine) on the big, functional garage that he built himself. All parties are pleased.

Either print your image (at any scale), or open it in a program that will allow you to add guides, like Photoshop.
Divide your image into several equal segments in each direction, either by drawing lines or by digitally adding guides. The idea is to subdivide the image into portions; each portion should be simple enough on its own to draw easily by hand.
Once your plywood is completely dry, replicate the grid on the plywood (sized up, but with the same exact proportions). The charcoal pencil I used wasn't easy to erase, and I didn't want stray lines all over my board, so I used painter's tape for the lines. I also used tape for the long, straight lines of the design.
Use chalk or charcoal to draw the image on your board, section by section, removing the tape as needed.
Once the image is outlined, paint on one coat of oil paint. Let dry, and apply more coats as needed - I used three coats in some places. Obviously, it's a bit tedious. Now just give it a coat or two of polyurethane.
And - credit where credit is due - Allen cheerfully and expertly hung the sign (a nail gun works fine) on the big, functional garage that he built himself. All parties are pleased.


Is it safe to assume that this is what Paul and I are getting for Christmas??? Can't wait!
ReplyDeleteNo beez?
ReplyDeleteGood thing you have that nice, appropriate-height garage to hang things like this on.
ReplyDeleteIt is beautiful!
ReplyDeleteMy husband almost never questions when I do house stuff, except when I add (more) florals!