I'm hot for fold-over clutches. I love
Clare Vivier's gorgeous leather ones (aside: what I wouldn't I do for a stack of leather and a belt driven
Juki?) and I'm spying them all over the (interwebs) place. I have a personal policy of not spending more than $50 on a bag. I ruin them. Elizabeth, on the other hand, is my role model. She will invest wisely in a purse that she uses, sometimes for years, and it always stays lovely. Me? I'm throwing it on my back, attaching straps where none are meant to be, I'm throwing it in my bike box, it sits in corners of bars at concerts... I also (have you seen this site?) like to make something myself, if I think I can. So, with some lovely navy linen and a lining of tan waterproof nylon for structure I made myself a fold-over clutch. Full tutorial and thrilling illustrations after the jump!
Supplies:
- Metal zipper, at least 12"
- Exterior and lining fabric, at least 13.5" x 24" and a bit more for zipper binding
- Fabric for binding
FABRIC
Cut both your interior (lining) and exterior fabric to 13.5" x 24".
ZIPPER
You'll need to cut your zipper (with it zipped) to 11.5". This is fun with a metal zipper. Do it carefully and with your worst scissors.
Next, you'll make the binding for the ends of the zipper.
Cut two pieces of fabric 2" x 3.5" or so, I like to have it a little long while I'm working. Create the binding by folding each piece in half lengthwise, pressing, and then unfolding. Fold each edge towards the middle crease you've just created, just shy of the crease and press. You'll end up with the v-like pieces in the left picture, below.
Open the strip back up and line up one long-side raw edge of the binding with the raw edge of the zipper, right sides together. Pin in place and stitch along the first crease (c). After this you'll see the binding nicely wraps around the edge of the zipper. Slip stitch the reverse edge (a) to the zipper. When you've finished both ends it will look like the wide, middle image below.


Next, attach the zipper to the fabric. On one of the short sides, you'll make a sandwich of the fabrics, right sides facing, and the zipper, in the middle, facing the right side of the exterior fabric. If your right sides and wrong sides are all the same - win!

Use a zipper foot to stitch closely to the zipper.
Tip: Open the zipper a third of the way and stitch almost to it. Remove the fabric, close the zipper, and finish stitching. This lets you avoid the bulk from the zipper pull.

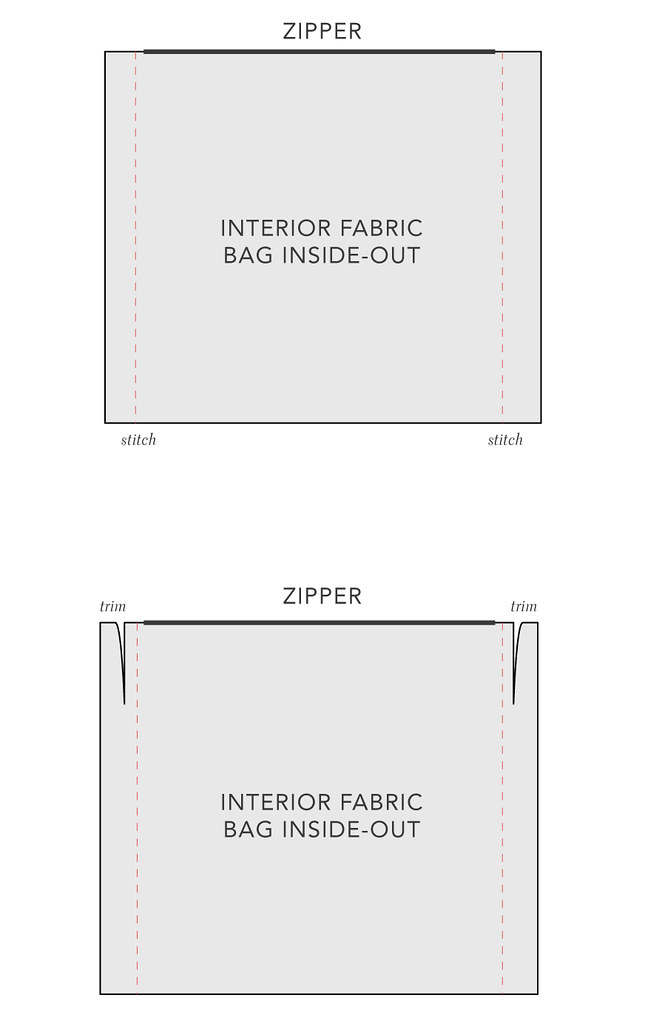
Zippers can be trick with an interior and exterior fabric. Below is a graphic that hopefully helps make it a little clearer.
THE BODY
When you've completed both sides of the fabric, lay your piece flat with the zipper at the top and inside out. Pin the layers in place and stitch along the opens sides just on the outside of where the zipper ends. Then clean up your raw edges, leaving a generous a 1/4 of an inch beyond the stitching.

Next, bind these two raw sides. Out of haste I used what pre-made binding I had but ended up really liking the pop of melon on the inside of the bag.

THE TADA
Finally, flip it inside out and press it all nice. You're done! Throw it in your bike box!


may I ask where you got that fabric? it almost looks linen, is it?
ReplyDeleteUgh, this is beautiful. (I precede everything with the word "ugh" now). Please make me one in time for my visit.
ReplyDeleteAlso, I'd like to point out (after having made this stupidest of mistakes on a million pillows) that in the "The Body" step, your zipper should be open when you sew the sides closed. Duh, I know. But how many pillows have I had to partly seam-rip when I couldn't open them? More than four, less than ten.
Hahahaha, I just pictured the whole scene of ripping the seems, I totally get you, its one of those things no one tells you but its a vital tip!
DeleteThat's a very useful tutorial!
ReplyDeleteI have been sewing pillow covers for a number of years now, and my inserted zippers never looked as neat.
I'll have to repeat after you...
Thank you, Jessica(?)!
Your blog is BEAUTIFUL!!! I'm putting together a list of links over on my blog for tomorrow are you are so on it! thanks for all the great projects!
ReplyDeleteThanks, everyone!
ReplyDeleteAnonymous: It is linen, I got it Grey Line in NYC. You can order online here: http://www.graylinelinen.com/home/
Love this clutch! The fabric is gorgeous! May I ask which type/weight of linen you used for this particular clutch? Thanks!
DeleteThanks for sharing this ingeniously easy tutorial! :)
ReplyDeletewww.thecreativemuslimah.blogspot.com
This is gorgeous! I am literally mid project and am so confused! I am a definite newbie to sewing and can't seem to figure out how to complete the other side of the body. Every tutorial of this type of clutch I can find mentions (2) exterior fabric pieces and (2) interior pieces, but yours only mentions (1) of each. Did I miss something? My 13.5" x 24" pieces seem like I should be able to fold them in half and then sew to the other side of the zipper, but I can't seem to visualize it. Can anyone help??
ReplyDeleteOk, I figured it out...Thanks for the wonderful tutorial and inspiration!
ReplyDeleteI am equally as confused as StefaniG but i can't seem to figure it out! Help! Please!! I'm at the same stage.. and i cant seem to figure out how to attach the other side of my material to the other side of the zipper!
ReplyDeleteOh man! I've figured it out too! it's inside out and upside down and topsy turvy and impossible explain all in one. But I feel like perhaps for both StefaniG and I, we had to get frustrated enough to post a comment, and then the divine sewing fairy gave us the solution to our problems!
ReplyDeleteThanks again for the great tutorial... several of my friends and sisters will be getting foldover clutches for christmas!!
StefaniG and ElisaDawn -
ReplyDeleteGlad you guys were able to figure it out; it is a tricky thing to explain! I have another tutorial on doing a smaller clutch which I included an extra graphic to try and help explain just this point in the process. I'll add it to this post right now.
http://www.ecabonline.com/2011/06/small-clutch.html
how turn inside out do you leave any opening on the side of lining for turning
ReplyDeleteI am 100% obsessed with this clutch (and the smaller version)! Thanks so much for sharing. I linked to your tutorial on my blog.
ReplyDeletehttp://modernmapper.blogspot.com/2012/01/sewing-success-clutch.html
Thanks so much for the tutorials. I made one and posted it on my art blog. XD
ReplyDeletehttp://mind-speaks.com/?p=571
Hi Benita!
ReplyDeleteThe zipper acts as your opening, actually! Very convenient! I zip it up almost all the way closed, do my sewing and then pull the zipper all the way open (it's not too hard though you're doing it from the opposite side) and flip inside out!
Kimmy, Page, thanks!!!!
ah...thanks for the tutorial...
ReplyDeletethanks for the tutorial, this very usefull
ReplyDeleteGreat tutorial! I especially love the leather zipper pull.
ReplyDeletehttp://blog.lulalouise.com/
gorgeous! my moms shop has hemp and hemp/organic cotton canvas and muslin's that would be superb for this simplififabric.etsy.com :)
ReplyDeleteVery nice Tute! even though I'm an experienced sewer, I always love a tute that has such good pictures!!! and I always love reading tutes for simple projects. I've "been there-done that" on the couture and now just want to have simplicity of projects in my life!
ReplyDeletethank you for taking the time to write all this and picture it up...it takes a lot of time!
Hello, lovely bag. How do you do the corner of your binding though? Do you go around it with one piece of tape, do a mitred corner, or do you use separate pieces for each side and the bottom? Would be grateful for any info.
ReplyDeleteThank you.
Sara
Hi, Sara!
DeleteI just bind the sides; there isn't a seam on the bottom. To cover the ends of each side's binding though:
- You make the binding about 1 inch or so longer than the seam on each side.
- Attach the binding to one side of the seam like your normally would (I'm referring to the stitch labeled "c" in the binding illustration up above).
- Wrap the binding that overhangs over the ends of the seam and then fold the binding as normal (the middle step in the binding illustration) and stitch in place (the last step and "a" stitch on the binding illustration).
Hope that helps!
I seem to have such difficulties with the binding. The sewing machine never wants to sew over it and it gets in a bog, old mess. Any tips?:)
Deleteopen binding, stitch in trough/fold, fold over in place and top stitch. works every time.
Deletehope this helps
Beautiful!!
ReplyDeleteThanks for the tut. It helped save my butt with my project today ;)
ReplyDeleteOh, this is quite clever. Thanx!!
ReplyDeleteEsther.
Just wondering - do you HAVE to cut the zipper? Could you just leave it and add to the fabric measurements accordingly? Since you're only cutting off 1/2"? Thanks!
ReplyDeleteI could only find a 9" zipper so I changed the measurements accordingly. And once I figured out that you have to turn it inside out to do sides, it came out great!
DeleteYay!
DeleteThe picture on Pinterest caught my eye. This is the kind of style I like, and will go with most of my fashions. While not much of a seamstress, I think with the great pictures and drawings I can do this. Thanks for the great detail. I will let you know how I do.
ReplyDeleteHi, this is a great tutorial. I will have a try. Thank you!
ReplyDeleteThank you very much, I will use this information very soon!
ReplyDeleteThank you for your friendly tutorial!
ReplyDeleteThanks, helped a lot. I had a pipe cord going along the zipper...not easy but i made it! Your tutorial made my task easier. Keep it up :)
ReplyDeleteThanks. Really help and it looks neat...:)
ReplyDeleteI want to try this bag with some wool melton fabric that my daughter gave me. I think it needs a bit of firmness to it and i was going to add some interfacing to the lining fabric. what are your thoughts on that?
ReplyDeleteLike! I'm 70 something, been sewing since I was 12. Have always had trouble with pillow zippers. Thanks for your very helpful advice. Your photos are great too! GO PINTEREST! I am SO addicted! Trying to keep up with all you young "Whipper Snappers" is keeping me young!
ReplyDeletethanks for this tutorial! it is brilliant!
ReplyDeleteI am SO going to try this right now! I have made a lot of zipper bags etc but indeed, never as neat. Why make it reversible when you will never turn it inside out?
ReplyDeleteI really love the way this looks, and indeed, add a touch of colour this way :) Will add piping tho ;)
Thanks for this!
This is the best instructions for installing a zipper I have found. I like the way you give good close ups and illustrations. I will use this pattern for my next bag/tote project. Thanks
ReplyDeletePat
Excellent tutorial, and your bag is lovely! I bind the seam allowances on most of my bags these days. So much tidier that way, as yours illustrates. Bravo!
ReplyDeleteThank very much! The zipper its almost a magician trick.
ReplyDeleteótima explicação, muito obrigada!!!! Ajudou-me muito!
ReplyDeleteBeijos do Brasil
thanks very much. :)
ReplyDeleteWhy am I only seeing this now? Thank you for the fabulous post.
ReplyDeleteIs it possible for this bag to have topstitching on the outer fabric up near the zipper for a finished look, I can't figure it out.
ReplyDeleteIs it possible to have topstitching on the outer fabric up near the zipper for a finished look? I can't figure out how to do it.
ReplyDelete