


Sometimes I get a little bit stressed about how much fabric I have. I still have a lot of fabric from the time I went to town here. And since an ample assortment of linens is something I envy, why not use up some of this fabric and give myself a few more inches in my linen stack? (That worked for me.) These are easy - probably a little easier than these pillow cases I did earlier - but both are great beginners projects. Details after the jump.
You'll need:
- 2 yards of fabric
- Pins, sewing machine, measuring tape... all of that lot.
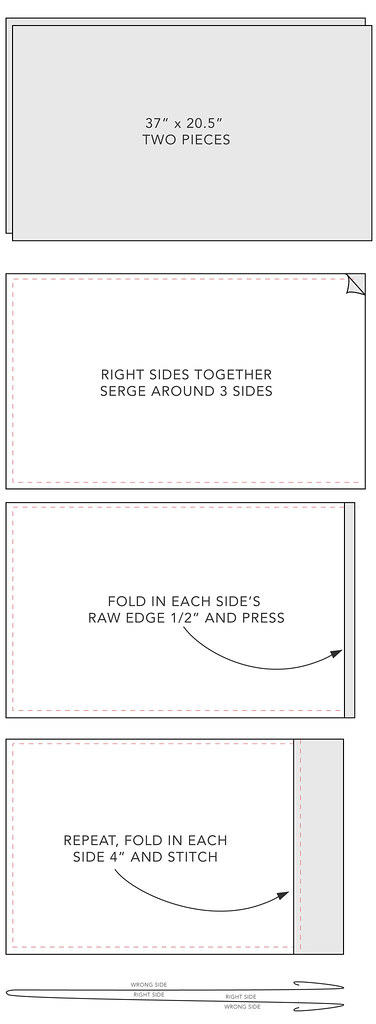
If you're curious, that bottom illustration is a section. My mind thinks this way; I'm not sure about everyone else.
This should fit standard pillows with a bit of extra length on the end, which I prefer. If this you don't prefer, take about 2" off the long side.
From your fabric, cut two pieces 20.5" x 37". Stack the pieces on top of each other, right sides facing, and stitch around two long sides and one short side. I used a serger for this but you can leave the edge raw or do a zig zag stitch over the edge. You could even add half an inch to each side and do french seams. Oh, la la (see what I did there?).
On your open end, fold the raw edge in 1/2" and press in place. Do this on both pieces of fabric. Next, take the edge you just folded and fold it in 4" on each piece of fabric. Pin in place.

Stitch around this inside fold (where the pin is) as close to the fold as you can. To get some use out of all of the extra stitches on my machine (and because I am becoming markedly girlier by the week) I used this loop-de-loop stitch.


I like the stitching you used; adds a very nice touch!
ReplyDeleteAs for that section view... you studied architecture at Tech, right?! Totally makes sense!
I love the stitching and the honeycomb pattern. I really need to redo my linen closet, throw out the damaged stuff and make new pillow cases! Thanks for show this!
ReplyDeleteMerissa - Totally! It's even more evident when you look at my book of sketches - the bags look like floor plans...
ReplyDeleteRose - Hurray! Go for it!
the fabric you used is so fabulous! it says 'spring' to me. I went over and read all about your fabric stock up- happens to me too often (though, usually I'm online and I just keep hitting 'add to cart' -hahahaha!).
ReplyDeletelovely!
Thanks! I'm so bad at shopping online! But maybe it's actually a blessing... haha.
ReplyDeleteIs this fabric from a specific designer? I WANT IT SO BAD!! Sorry for yelling. No, wait. I'm not sorry. I'm jealous and I want that fabric! It's classy and says, "bees" without being too young or too silly. I must have it!...
ReplyDeleteSummer, I'm so sorry! I don't have a lick of it left (I looked for scraps!) to see who the designer was. All I know is that I got in the treasure trove that is Marden's in Maine.
ReplyDeleteDang. And I'm all the way in California. Such is life. Thanks for looking!
ReplyDeleteTo make the pillowcase even easier, cut one piece of fabric 74" long (37" + 37") and 20.5" wide. Put the right sides together and sew the two long sides. Hem as directed. This just eliminates one seam, but makes a nice pillowcase just the same.
ReplyDeleteThanks for the tutorials round up!! I will definitely need those:)
ReplyDelete